Saturday, March 31, 2012

Masters Week Begins!

Aiken Fountain Spring

This is an HDR image I took while my wife and I walked downtown Aiken, SC 2 weeks ago. Finally got a chance to process it. Aiken was already in prep mode for the Masters coming to town. The "beauty-facation" process was in full swing for Spring! 

Workflow: 3 exposure (-2...0...+2) > Photomatix Pro (Custom set) > Adobe Photoshop Elements 10 > Topaz DeNoise(Jepg Strong) > Topaz Simplify 3 


I really liked the "oil painting" look I could give the image via Topaz Simplify but I didn't want a hash effect. I like to keep a bit of realism to most of my photos. I created a duplicate layer in PSE 10 and added the effect. I then reduced the opacity to get what you see here.


If you have any questions about my workflow or anything... feel free to ask!
Be Great!
@Batteman87

Saturday, March 24, 2012

Aiken Community Playhouse HDR

Aiken Community Playhouse (HDR)

This is an HDR image I took last weekend of the Aiken Community Play House located in beautiful Downtown Aiken, SC.


Workflow: 3 exposure (-2...0...+2) > Photomatix Pro (Custom set) > Adobe Photoshop Elements 10 > Topaz DeNoise(Jepg Strong) > Adjust 4 - If you would like to know more about my workflow, or have any questions, feel free to ask!

Keep Shooting, and be great!
Jimmy Batte

FREE Adobe CS6 Beta


It's been a while since Adobe has issued a public beta for their "top dog" software. I wanted to wait a few days before posting to let the dust settle and ensure it's not too "buggy". I know the last thing I want to install is a pain in the a$$ that I will struggle with. Seems there are a few bugs but worth the download to see if it would be worth paying the premium price tag that Adobe seeks.


Get it here > FREE Adobe CS6 Beta  
(FYI: Link take to directly to Adobe to download CS6 Beta)

Sunday, March 18, 2012

Downtown Aiken, SC - HDR

My beautiful and pregnant wife  and I spent some time this St. Paddy's Day weekend Downtown Aiken, SC. Here are two shots I captured with my basic HDR workflow.

High Country Olive Oil - Aiken, SC.
High Country Olive Oil - Aiken, SC. (HDR)

Visited a great shop while shooting some photos in Downtown Aiken, SC. High County Olive Oil is a hidden gem. It's a premier olive oil and balsamic vinegar tasting bar and store. They have searched the world to find the best and freshest oils and balsamics for you to enjoy and use in your kitchen & recipes. The staff and owner was superb. The tasting bar was fantastic as was the flavor(s) of the oils/balsamic's/mustard's/preserves.
If you're ever downtown Aiken, SC. Check it out.

Workflow: 3 exposure (-2...0...+2) > Photomatix Pro (Painterly custom set) > Adobe Photoshop Elements 10 > Topaz DeNoise (Jepg Strong) 

Aiken Brewing Company aka Brew Pub
Aiken Brewing Company aka Brew Pub for us locals - Aiken, SC. (HDR)
The Aiken Brewing Company aka Brew Pub as us locals know it by, is a staple of Downtown Aiken. ( Aiken, SC.) St. Paddy's Day morning was perfect for HDR and I was ready with my camera.

Workflow: 3 exposure (-2...0...+2) > Photomatix Pro (Custom set) > Adobe Photoshop Elements 10 > Topaz DeNoise(Jepg Strong) > Adjust 4

Friday, March 16, 2012

30% OFF ALL Topaz products this weekend only!

With perfect timing of my HDR tutorial, Topaz Labs is "Going Green" this St. Patricks Day and allowing you to get 30% OFF ALL PRODUCTS!!!  Now's the time to buy!

Check out all of the great software they have, but if your looking for the basics. I highly recommend Adjust 4 or the NEW Adjust 5. If you're feeling "froggy", check out All of their Products and decide what you would like or save BIG and get the Bundle!  (This offer Expires 3/18/12)

Be SURE to enter the coupon code 
"TopazGold" 
if you purchase, to save your 30%! 


Adjust 4 is what I use for great HDR images

Newly Released version of Adjust! 

Check out all of their software or get the "Bundle"

If you have any questions, feel free to hit me up!

Be Great!
Jimmy Batte 

Thursday, March 15, 2012

10 Easy Steps to HDR


I often get asked about how I create my HDR photos. With this post,  I've decided to share my basic HDR workflow. I've created a 10 easy step process / tutorial to follow. Follow these simple steps and it won't be long until you are wowing others with your great HDR shots!

10 Easy Steps to a Great HDR Image

Step 1: Pick your shot -  
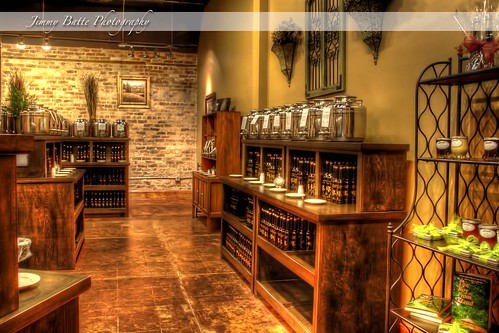
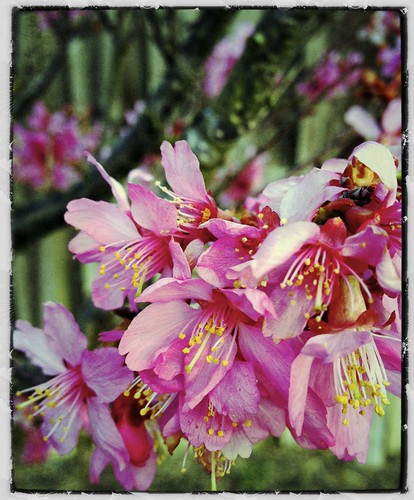
HDR allows you to see into the shadows. To do this, you need a subject that typically has a good amount of contrast between light and dark. HDR also draws out details that normally you wouldn't pick up on with the naked eye. So it's also good to have a subject that does have little details like wood, stone, antiques, and/or clouds just to name a few.

Grove Park Inn Great Ball Room Christmas HDR
HDR Image of the Great Ball Room at the Grove Park Inn (Asheville, NC)


Step 2: Set up your tripod & camera - If you desire great shots with HDR you NEED a tripod or at least something stable to have your camera on that WILL NOT MOVE thus allowing you to take the multiple exposures you need for HDR and prevent any ghosting that could occur. Next, set up your camera. Some cameras (but not all) offer a great little setting called Auto Exposure Bracketing (AEB). Read your manual to see of your camera has this feature. If not... Don't fret, you will just have to do it manually (this is where the tripod would REALLY be required).

I use these settings on my Canon Rebel: AEB -2...0...+2, AV mode/Aperture Priority, and set the aperture to f 11. Lastly, I set the self timer to 2 seconds. Setting the timer allows you focus the shot, depress the shutter button, release the shutter button, and then allow any movement of the camera to stop... thus preventing any unwanted camera shake that could cause image ghosting. (A shutter trigger release is also a good option if you don't want to use the timer.)


Step 3: Check the ENTIRE scene - Initially, you might think have a great shot. But, be sure to look all around the entire scene before you take your shot(s). Watch out for the neighbors bright blue kiddy pool behind that old barn. The last thing you want is a great subject but the surroundings or background detracts from your focal point.

Step 4: Take the shot(s) - Once your pleased with your subject and surroundings... Take the shot(s)! I typically shoot 3 exposures (-2..0..+2) 


The following photos are from when I first started to dabble in the realm of HDR. These are some of my very first HDR attempts. While not great... I wanted to show that everyone has to start somewhere.

HDR Tutorial -2
-2...1...0...+1...+2
Under Exposed = Dark

HDR Tutorial 0
-2...1...0...+1...+2
"Normal" Exposure
HDR Tutorial +2
-2...1...0...+1...+2 
Over Exposed = Bright

Step 5: Load your photos onto your computer - Can't break this one down much more... Load the images you just took (specifically, the multiple exposure AKA "bracketed"images) onto your computer.


Step 6: Select the multiple exposure images you just loaded on your computer and now load them into Photomatix Pro (There is also a FREE Trial edition of this great software, but will come with a watermark when you attempt to save it.)
  • Either "Browse" for your images, or "Drag & Drop" the images into the window. ( I select all of my images and then "drag & drop" to the Photomatix Icon on my desktop. This opens/activates Photomatix with my images already selected.) Once your images are selected, click OK. 


Select your bracketed/multiple exposure images.
Click OK


Check as above and click Preprocess 
Initial tone-mapped Image (Photomatix Painterly Preset selected)

Select any preset you would like to start with from the thumbnails that Photomatix Provide

Step 7: Tone-map your image as you desire.  Don't be afraid to toggle with the Adjustments menu (usually opens beside your image.) Adjust it until you're happy with what you have. 

Once you're happy with the result, Click Process

Your final Tone-Mapped Image will load.
 Click
File > Save >Name and Save as 8-Bit Tiff
TIP: Just save the image to your desktop to make it easy to find.

Ta-Da!!! Your HDR Image! I like, but don't love it... yet!  At this stage, I consider this a "Rough-Draft HDR" Image.  Technically, you can stop here. But, I know this and all images have more potential. They can get better. On to step 8!


Step 8: Open the "Rough-Draft HDR" image with PSE10 and create a duplicate layer.

Step 9: Run the Topaz Labs DeNoise filter
99% of the time, I use the JPEG - Strong setting.


Step 10: Duplicate another layer in PSE10 and then run the Topaz Labs filter Adjust 4 (or Adjust 5 if you have the newly released software). Select a preset (LEFT Menu) that you like or at least would like to start from.   Make any adjustments (RIGHT Menu) , or "fine tuning" that you desire.
I selected Topaz Adjust 4 > Whatever preset you like  > Adjust Settings to you likeness >
Click OK.

Sometimes will decrease the opacity to 75% on the top layer to take a little "edge" off of the image.
If I'm happy with the image, I then select
File > Save As > Jpeg Copy 

(I usually save as medium quality, unless I decide I want a large print.)

Original Tone Mapped and DeNoised Image


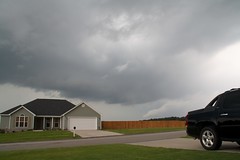
Final HDR Image... Notice the details in the clouds and fence now.


Below are the software essential to creating GREAT HDR images.


I've used these essential programs from the beginning of my HDR work, and I still use them today. By far... I feel it's the best budget friendly software and plug-ins available.  Especially if your very budget conscious like me.


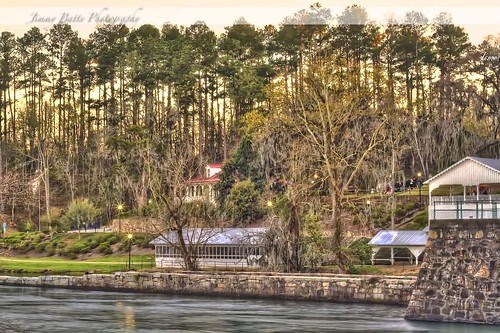
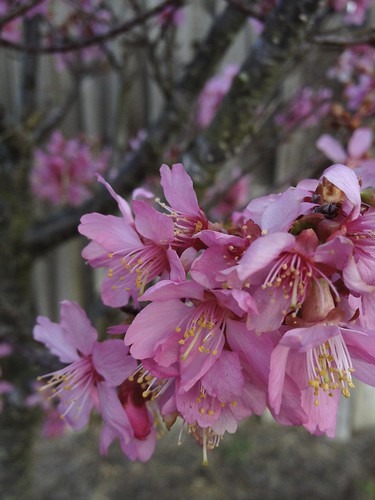
Some of my recent HDR Images
Heavy Chevy
Photomatix Pro > Adobe Photoshop Elements 10  > Topaz DeNoise > Topaz Adjust 4
Augusta Lock & Dam
Photomatix Pro > Adobe Photoshop Elements 10  > Topaz DeNoise > Topaz Adjust 4
A last little bit of advice for this long post.... Don't get too discouraged with some of your out comes. Keep practicing. You see how I started. Remember, you might go out and shoot 300+ images and only get one good set... but trust me. Keep at it, and you will get better. Your images will get better. Don't dismiss your "bad" images. Learn from them. What did you do wrong? What could you have done differently to change the outcome?  Eventually, those same bad images that you despise, will make you better photographer.

Be Great,
Jimmy Batte

10 Easy Steps to HDR 
  1. Pick your shot
  2. Set up your camera & Tripod
  3. Check the ENTIRE scene 
  4. Take the shot(s)
  5. Load your photos/images on the computer
  6. Load multiple exposure photos/images to Photomatix program
  7. Tone-Map with Photomatix and save as 8-Bit Tiff
  8. Open in Photoshop Elements 10 (PSE 10) and create a duplicate layer
  9. Run a DeNoise filter (I use Topaz DeNoise). Duplicate layer in PSE 10 again.
  10. Run Topaz Labs Adjust to your desired likeness.
If you have any questions, feel free to ask. 


Monday, March 12, 2012

Aiken Flickr Walk II

Augusta Lock & Dam
Lock and Dam located in Augusta, Ga. 

Our Aiken Flickr group went on a "Flickr Walk" again this past weekend. Here is one image I captured as the sun was going down behind the tall southern pine trees. 

iPhoto for iOS released


With Apple's announcement of the New iPad (Retina Display) last week, they snuck in this little charming app. iPhoto for iOS devices. Similar to the iPhoto app for Macs but it's spicifally for iOS devices (iPad 2, iPhone 4, iPhone4S. I downloaded it on release day for my iPhone4S. Still playing with it, and will bring a little review as I learn/play with it a little more.  So far, I like it, but I think I like Nik Snapseed ($4.99) a little more. I don't know if it's because I am use to the Snapseed App or if I can't figure out iPhoto yet. If you have an iOS device it's worth looking into. It's currently being offered @ $4.99 in the Apple App Store. (Note: it IS NOT compatible with iPad first generation)

Tuesday, March 6, 2012

Cheating Art

IMG_0305
Photo via iPhone 4S No Processing
IMG_0306
Photo via iPhone 4S Post Processing

Photography is art. If you don't believe me, try taking a picture and getting someone to WANT to hang it on their wall. Anyone can take a picture, but it takes an artist to make a picture great. Almost ALL published photos you see are post processed. Many feel that this post processing is a form of "cheating". They feel the computer does all the work. I only wish it were that easy. (If it is, and I'm missing something, PLEASE let me know... I'm in the market for the "easy button" for post processing). No doubt, there is a fine line between polishing & gross alteration...but no matter how you look at it, it can be defined as art.

Brittannica defines the term art as
"the use of skill and imagination in the creation of aesthetic objects, environments, or experiences that can be shared with others."

As an artist, this is what I do. Though I do tend to stick to the realm of real or "realism", I do use my skill in both taking the photo(s) and in the post processing. I aim to create stunning aesthetic visuals, that I sincerely hope everyone can enjoy and appreciate. 

That being said, I don't consider post processing as a substitute for good camera skills. I do my best to get the photo perfect with the camera. This saves a tedious time that might be needed during the post processing portion. Wether you agree with my perspective or not, I again, sincerely hope you enjoy my photos... Both unprocessed and processed. After all, I've never heard any complaints about Norman Rockwell's Saturday Evening Post photos and post processing... You read that correctly...I typed it correctly...photos. I will post more on the Norman Rockwell, the "God Father" of HDR later. Until then...

Be Great,
Jimmy

IMG_0306

Sunday, March 4, 2012

Grove Park Inn Hand Signed Print Now Available!

Note: Watermark will not be on Hand Signed print

This is the print that "set it all off". I get several request for this image, and I'm ecstatic to finally able to offer it to you! This is a High Dynamic Range (HDR) photo is of the spectacular Grove Park Inn Spa & Resort Wood Cart. When I took these photo, I literally could not feel my fingers, it was so cold! If you've ever been there, you'll too have a great appreciation for the beautiful and gigantic fireplaces & warm hearth lined with rocking chairs. This print is available in multiple sizes and I hand sign each one ordered. Thanks for looking!


Grove Park Inn Wood Cart

Saturday, March 3, 2012

First Hand Signed Print Available!

Each Print is Hand Signed!

I'm super excited to be able to offer my prints from my blog here. By taking out the "middle man", I'm able to offer these awesome quality prints at super affordable prices! You will be able to get them in multiple sizes & I will hand sign each one of them! I just posted the first one, The Old Plantation Oak. It's an HDR image of an old oak tree located on the grounds of the southern plantation of Redcliffe. (Beech Island/Aiken, South Carolina).

This is a photo of a framed, double matted, & hand signed edition of this photo.
The double matte colors are: Rocky Mountain & Thunder
Note: This photo & lighting makes it appear darker than it actually is.

Note: Hand signed edition will not have watermark.


The Old Plantation Oak


Be sure to check back often, I look forward to offering more hand signed prints soon!
If you have any request or questions feel free to hit me up on Twitter or email me Batteman87@hotmail.com

Be Great, & thanks for looking!
@Batteman87