Sunday, May 27, 2012

HDR Practice w/ Work Flow

Augusta Lock & Dam (HDR)

Captured this high dynamic range (HDR) image a few months ago. It was taken in Augusta, GA at sunset. Just wanted to practice some HDR techniques... Wasn't thrilled with the original look so I decided to "Run it through the mill" to see if I could get a look that I liked. This is what I ended up with.

Work Flow

  1. Photomatix Pro - Combined 3 exposures -2, 0, +2 and tone-mapped w/ custom setting. Saved as 8-bit tiff.
  2. Adobe Photoshop Elements 10 Opened image and created a duplicate layer.
  3. Topaz DeNoise  Jpeg Strong selection
  4. Adobe Photoshop Elements 10 created a duplicate layer.
  5. Topaz Clean 3 Curly Smooth Custom setting
  6. Adobe Photoshop Elements 10 Applied custom Watermark & saved as medium jpeg. 

We Remember.. We Thank You!

A Memorial Day Tribute

Never Forget! 

We wish you and your family a safe and Happy Memorial Day weekend! Thank you to all of you who have served or had some one serve. Freedom is not free, we know this, we remember this, We thank you! 

Jimmy Batte

Saturday, May 26, 2012

Single Image Adjust 5 Demo

Wanted to show off some of the great effects that Topaz Labs offers in their Plug-in Adjust 5. I frequently use Adjust 5 in my multiple exposure High Dynamic Range (HDR) photos but, I wanted to demonstrate what this great software can do with single images.  Below is a single image that I took of my wife while playing with some maternity shots.

Single Image RAW - ISO 100 - 63mm  - 0 ev - f/5 - 1/160 - NO Processing

The single image above w/ Adjust 5 "Film Collection"  > "Vintage Grunge III" Applied


Image Before = Below Shoulders /After = Above her shoulders. 
Another Great thing about Topaz Adjust 5... Layers. You can apply multiple effects to the same image. I took the same image (with the Vintage Grunge III look alread applied) and then added Adjust 5 "Classic Collection" > "Soft Focus I"to get what you see below. YES... it's that easy!


Single Image  Adjust 5: "Film Collection"  > "Vintage Grunge III" Preset > "Classic Collection" > "Soft Focus I" Preset .  YES! It's that easy! 

Before
After


If you're looking for something to make your photo's "Pop" and get that second look from your audience... Adjust 5 will do it! Topaz Labs even offers a FREE Trail for 30 Days if you want to try it out, but for $49.99 this is a great deal for what you can get. If you have any questions, feel free to ask!


Be Great, Keep Shooting!
Jimmy Batte
@Batteman87

Sunday, May 20, 2012

Greenville Garden HDR

Greenville Garden at the Falls

Finally able to work on this image I took a few months ago. Here's another workflow... 

WorkFlow

  1. Photomatix Pro (Custom Setting)
  2. Adobe Photoshop Elements 10 Duplicated a layer
  3. Topaz DeNoise
  4. Adobe Photoshop Elements 10 Duplicated a layer
  5. Adjust 5 "Simple Pop"
  6. Adobe Photoshop Elements 10 Duplicated a layer
  7. Topaz Simplify "BuzSim" - Custom adjusted 
  8. Adobe Photoshop Elements 10 Duplicated a layer
  9. Color Efex Pro 3.0-Complete applied "Soft focus II" - Custom adjusted
  10. Adobe Photoshop Elements 10 Cropped the top of the image to get rid of buildings
  11. Adobe Photoshop Elements 10 Applied a blank a layer 
  12. Adobe Photoshop Elements 10 Watermark Bar
  13. Adobe Photoshop Elements 10 Watermark Signature 

Saturday, May 19, 2012

Local Propaganda Plug & Play

Robb Underwood -Local Propaganda
Got a chance to listen to a great band (Local Propaganda) play last night at the Fox's Lair in Augusta, Ga. Took this w/ my iPhone 4S. Check out Robb's Blog -The Unsung Songwriter where he's posting a new song every week! If you ever get a chance to see these guys play, do yourself a favor and go! 

Image WorkFlow
  1. iPhone 4S (Camera+ App) 
  2. Adobe Photoshop Elements 10 (PSE10) - Duplicate Layer
  3. Topaz DeNoise - Medium Jpeg -Apply
  4. PSE10 - Duplicate Layer
  5. Topaz Adjust 5 - (Detail Medium)
  6. PSE10 - Duplicate Layer
  7. Topaz BW Effects - Low Contrast I Vignette 
  8. PSE10 - Decreased BW Layer to 75% 
  9. PSE10 - Created a blank Layer for bar
  10. PSE10 - Created a blank Layer for Text
  11. PSE10 - Created a blank Layer for Watermark ~ On the Guitar :-)
  12. PSE10 - Saved as Max size Jpeg 10

Sunday, May 13, 2012

Greenville Falls

Greenville Falls
High Dynamic Range (HDR) image of downtown Greenville, SC. I don't often to afternoon HDR but the clouds and surroundings actually worked toward my advantage. Thanks for looking!
Workflow: 3 exposure (-2...0...+2) > Photomatix Pro (Custom set express not tone-mapped) > Adobe Photoshop Elements 10 > Topaz DeNoise(Jepg Strong) > Adjust 5

Aiken Train Depot & Welcome Center

Aiken Train Depot & Welcome Center
The Aiken Train Depot (Aiken, SC). Took this image while we taught an HDR class. This is an HDR image of the Train Depot as the sun began to peek over the tree tops.
Workflow: 3 exposure (-2...0...+2) > Photomatix Pro (Custom set express not tone-mapped) > Adobe Photoshop Elements 10 > Topaz DeNoise(Jepg Strong) > Adjust 5

Saturday, May 12, 2012

HDR Field Trip: Aiken Railroad Depot

Aiken Depot Railroad Cross (Express)
Aiken, SC Railroad Depot RR Crossing sign in HDR

Workflow: 3 exposure (-2...0...+2) > Photomatix Pro (Express Custom Setting NOT Tone-mapped) > Adobe Photoshop Elements 10 (created a layer) > Topaz DeNoise(Jepg Strong)> Adobe Photoshop Elements 10 (Watermarking & Saved as Jpg.)
While helping my father-in-law teach an High Dynamic Range (HDR) photography class, I was able to capture a few images myself. We decided to get to the Aiken Train Depot early to take advantage of the low light desired for HDR. As we were about to wrap up, I shot this image as the sun began peeking through the trees.

Note the "Rule of Thirds" in full effect here... as is a nice little sun burst through the tree limbs/leaves. I like the image so much initially after the HDR, I didn't do much post processing. The above image is how it came out of Photomatix Pro. Below, are the two of the same image that I took a little further in the post-processing just to see what I could get. I am pretty happy with all of them and wanted to share a little of my workflow on how they came to be. 


Aiken Depot Railroad Cross (BuzVersion)
Aiken, SC Railroad Depot RR Crossing sign in HDR
Workflow: 3 exposure (-2...0...+2) > Photomatix Pro (Express Custom Setting NOT Tone-mapped) > Adobe Photoshop Elements 10 (created a duplicate layer) > Topaz DeNoise(Jepg Strong) >Adobe Photoshop Elements 10 (Created duplicate layer) > Topaz Simplify 3 (BuzSim Custom) > Adobe Photoshop Elements 10 (Watermarking & Saved as Jpg.)

Aiken Depot Railroad Cross (NikVersion)
Aiken, SC Railroad Depot RR Crossing sign in HDR
Workflow: 3 exposure (-2...0...+2) > Photomatix Pro (Express Custom Setting NOT Tone-mapped) > Adobe Photoshop Elements 10 (created a duplicate layer) > Topaz DeNoise(Jepg Strong) >Adobe Photoshop Elements 10 (Created duplicate layer) > Nik Color Efex Pro 4 (Paper-toner) > Adobe Photoshop Elements 10 (Watermarking & Saved as Jpg.)

If you have any questions, feel free to ask or hit me up on Twitter @Batteman87
Thanks for looking!

Be Great,
Jimmy Batte

Monday, May 7, 2012

Photomatix Pro 4.2 Available

Photmatix Pro HDR on my John Deere D100

HDRsoft's great software Photomatix Pro has updated over the weekend. Below are a list of updates and a download link for both Mac and Windows. Don't forget to use my name JimmyBatte at checkout to save some $!  If you're looking to get into High Dynamic Range (HDR) photography... this is a staple!

Update log
30-Apr-12 - Updated in v4.2
Main new features in v4.2
-Display options for preset thumbnails: View at a larger size or in two columns, and filtering built-in presets by category.
-Simplified size options on Preview dialog: Size ratio mechanism replaced by magnifier icons for zooming in or out at 20% increments.
-"Finishing Touch" palette for post-processing a tonemapped or fused image: Options for increasing contrast, adjusting the saturation of individual colors, and sharpening.
-Addition of 20 built-in presets.
-New fusion method designed to produce natural-looking rendering of interiors with bright windows. This method is called Fusion/Realistic and is only accessible in batch mode. Note that Fusion/Realistic requires much longer processing times than the other methods.
-Transfer of all EXIF metadata in the source photos to the tonemapped or fused image.
Other updates in v4.2
-Option to import presets. The option is accessible from the Preset Category combo-box when the "My Presets" tab is selected.
-Changes in the Details Enhancer algorithm aimed at addressing the issue of difference between the preview and final image that may occur in some cases.
-Custom presets can now be organized in groups. Presets belonging to a group are listed under a sub-menu of the Preset combo-box list of the Setting Adjustments dialog, as well as on the Preset Category combo-box of the Preset Thumbnails panel when the "My Presets" tab is selected.
-Option in Batch of Bracketed Photos for reducing the size of the output files, and adding contrast and sharpening.
-Added support for Raw files from the Canon S100, 5D Mark III and G1 X, Nikon D4 and D800, Panasonic GX1, Fuji X10 and Sony NEX-7.
-Various small improvements to the dialog for entering EVs that is showing when the source photos do not contain exif metadata or when one or more exposures are the same. In the latter case, the dialog now lists the exposure information read from the EXIF metadata.
-Option in Batch Single Photos for adding a suffix to the output file name.
-In Naming Options of Batch Bracketed Photos, ability to only use the name of the first file in the bracketed set to compose the file name of the combined image.
-Added support of undo and redo keys (cmd+Z/cmd+shift+Z) to Setting Adjustments window as shortcut to the "Undo" and "Redo" buttons.
-File created in batch mode is automatically renamed if a file with the same file name already exists.
-Ability to open saved image in another application now also available when saving a 32-bit HDR file.
-Added detection of DNG files saved with Fast Load Data option, returning an error message when loading them instead of processing incorrectly.
-Option in Preferences to save EXR files without Mac OS X Image I/O framework in order to avoid normalizing the floating point values before writing them.
-Made watermark removal accessible to licensed users of Photomatix Essentials and Photomatix HDR Plug-In for Aperture.
-Bug fixed: Memory leak when the "Show intermediary 32-bit image" box is checked.
-Bug fixed: Clicking on the "Preview sample..." button of the White Balance setting section of the Preprocessing dialog prompted to a directory other than the directory of the loaded bracketed Raw files.
-Bug fixed: Histogram did not refresh when coming back to the tonemapped/fused preview image by unchecking the 'Preview' box.


 use coupon code
JimmyBatte 


Workflow for John Deere D100: 3 exposure HDR (-2...0...+2) > Photomatix Pro (Custom set) > Adobe Photoshop Elements 10 > Topaz DeNoise(Jepg Strong) > Topaz Simplify 3 (BuzSim).

Saturday, May 5, 2012

36 Week Maternity Shots

My beautiful wife Lauren 36 weeks pregnant with Millie Grace Batte
Photo taken at Redcliffe Plantation, (Beech Island) Aiken SC.
Went out to get a few more maternity shots before Millie Grace makes her appearance. The baby photos will be starting soon I'm sure.  Will post more as I get a chance to work on them. Also have an exciting project I'm working on that I hope I get a chance to announce soon. Thanks for looking!

Work Flow

  1. Opened image in Adobe Photoshop Elements 10 (PSE10)
  2. Duplicated layer in PSE10
  3. Ran Topaz DeNoise filter (Strong)
  4. Duplicated Layer in PSE10
  5. Ran Color Efex Pro 3.0-Complete (Custom Glamour Glow setting)
  6. Added a blank layer for custom water mark I created in PSE10

Friday, May 4, 2012

Wiggle It 3D (Tutorial)

Wiggle It 3D! - (A first attempt)

Not too long ago I came across a cool little photo trick called "Wiggle 3D". Working a good bit in high dynamic range photography (HDR), I thought this posed a challenge to change it up and try something new. This type of photo has a high dynamic all to itself that produces a pretty cool effect. This is a quick little tutorial on how to "Wiggle It 3D". All you need for this is a simple photo editing software (see below) and two carefully captured images to process.

Step 1. Capture the image(s)

Find a subject that has both foreground and background elements. The idea is to have your subject in the middle ground.

Using a tripod, photograph the scene twice. Move the camera slightly to the right or left only about 4 inches. (Level ground works best for your two shots. Hills can pose a challenge but can be done.) Be sure to keep your subject in the same place in the view finder. Manual setting works best to do this.

Step 2. Align The Images
After shooting the two photographs, open both them in your favorite photo-editing software that supports Layers.   
  1. Copy/Paste one of the shots onto the other, creating two Layers in one image. (Close the single-layer file.)  
  2. In the double-layer file, change the Opacity of the top layer to 50%.  
  3. At 90% to 100% magnification, use the Move tool to position the top layer so that the main subject is directly on top of the main subject in the bottom layer.  
  4. If one image is tilted slightly, Rotate the top image for better alignment. When the two images are aligned, bring the top layer’s Opacity back up to 100%.  
  5. Crop the image as desired, and then resize it. (Smaller files work best, so try something around 6 to 8 inches wide at 72 dpi.)
Step 3. Animation 
This is where the "magic" happens. I used Photoshop Elements 10 (PSE10). Below are the steps I used to create my image in PSE 10. (If you are using other photo editing software, check out below.)

  1. PSE 10 Step 2 Align The Images finished
  2. Choose File > Save for Web. 
  3. Select Animate, (this activates the Animation options). 
  4. Select a frame delay of .2 seconds for most images. (This appears at the bottom of the open PSE 10 window)  .2 was my default and came up automatically for my image. Make sure to keep Loop checked. Preview your animation by clicking the Preview In icon along the bottom. 
  5. Click OK and Save your file as a .gif.
This same process also works for PSE6 thru PSE10

Photoshop CS4, CS5 
Activate the Animation palette from the Window menu. From the Animation palette menu, select Make Frames From Layers. Click below each image in the Animation palette to change the animation delay time. Try .1 seconds or .2 seconds, or select Other and enter a decimal value. (I prefer .17 seconds.) You can then preview your animation by clicking the Play icon. From the Animation palette menu, select Optimize Animation. Then choose File > Save for Web & Devices, and Save your file. 
My Wiggle 3D inspiration and more "How To" tips  via Adorama. "Wiggle 3D: How To Make Animated 3D Images"

Step 4. The Upload....
I generally post to Flickr but for this, I don't. Flickr doesn't support this type of image, or at least I haven't found a way to get it there. It just uploads the file but doesn't animate. (I think it even converts it to a .jpg.)
So... What I have done is created a FREE account at ImageShack.US to upload the .gif file. They provide the needed html, and other languages need to post to various other  forums etc. I then capture the code I need a voila! 


  1. As much as possible, use the same manual settings—manual focus, manual exposure, pre-set white balance, etc.—for both captures to keep the images as identical as possible. Even a slight adjustment of framing may be enough to alter a programmed exposure or white balance, which will have a negative impact on the animation.     
  2. Main subjects usually are best placed in the middleground. Follow the classic layering techniques to give the images both foreground and background intrigue.     
  3. Landscape is usually better than portrait for Wiggle 3D animations.     
  4. Vertical subjects work particularly well; when used as the axis of rotation, virtually no part of them appears to move.     
  5. While many Wiggle 3D compositions work well with subjects placed in the center of the image, interesting effects can be achieved by placing your main subject off-center. But it's easier to get started with centered compositions.     
  6. Tripods are almost a necessity, and it helps to be on level ground.   
  7. Use a level, such as the hot-shoe type, to keep the camera horizontal.
  8. Move your camera in an arc around the subject, not parallel to the subject. Imagine your camera rotating on the end of a string that is tied to the main subject.
  9. Always move the camera left or right rather than up or down.     
  10. Experiment with the left/right distance. About 4 inches works well for most subjects, but try varying the distance for different subject distances and focal lengths. In general, close subjects, especially with telephoto lenses, require smaller left/right distances.     
  11. It is usually better to shoot with wide angle lenses and then crop later. While subjects may appear small relative to expansive scenes, the wiggling of the foreground and background elements will focus the viewer’s attention onto the main (not-wiggling) subject.     
  12. If using one camera, avoid elements that move between exposures—such as people or wind-blown trees—


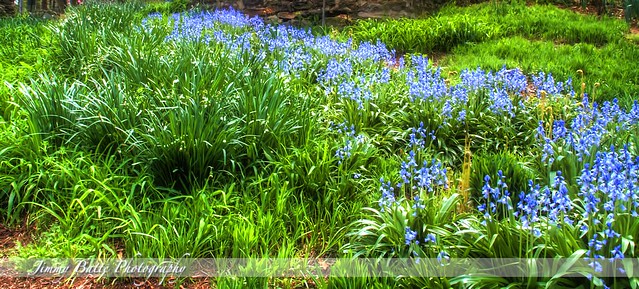
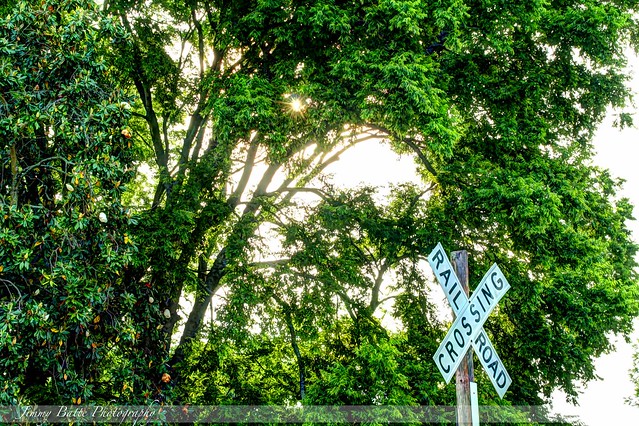
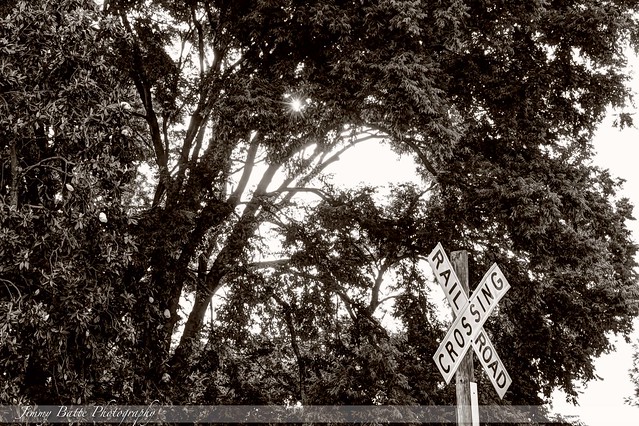
My Wiggle It first attempt(s)


Now... a real challenge poses itself.... create a Wiggle It 3D HDR! Challenge accepted!

Keep shooting, Be Great!
Jimmy Batte